Tuesday, 29 March 2011

Pear-chocolate tart


It’s not all wine and dessert at my work, much as we may try. We do have a healthful regime, in the shape of a weekly fruit delivery from the people at CERES. Sadly, the end of every week finds the furry brown bosc pears unloved and unchosen, softening in the corners of the plastic tub, inexorably passed over for the peaches.

I know how they feel. I relate to those pears. I remember what it was like at school whenever competitive sports teams involving balls and other such horrors were chosen. I didn’t even want to be in a stupid team, any more than a pear wants to be quartered and eaten, but being last-picked every time, and then only grudgingly and because the teacher insisted … well, it rankled. I’m not bitter though.  

Anyway, so I took the rejected, humiliated, demoralised pears home, and brought about their meeting with dark chocolate and pastry, and, well, it was like they’d cast off their spectacles and found Clearasil. Judging by the state of the plate not long after they were returned to the kitchen at work, they’d have no trouble whatsoever getting a deb ball partner in Year 12. But before this analogy runs any further off the rails, let me consolidate here the many online sources I consulted.

Gluten-free crust adapted very loosely from Gluten-free Girl and others
1 cup rice flour
½ cup potato flour
¾ cup cornflour
3 teaspoons icing sugar
¼ teaspoon salt
120g unsalted butter, fridge-cold
1 egg
2 tablespoons white wine vinegar
¼ cup water once 1 iceblock is in it (does that make sense?)

You’re supposed to use a pastry cutter or fork to work the butter into all the dry ingredients that precede it, but the thought of going anywhere near all that squeakily super-fine substance makes me come over all funny-like and goosebumpy. So I let the KitchenAid take care of that with its dough hook, but it didn’t really take care of it and I had to unhitch the bowl and get into all that dustiness with a fork after all. Awful, it was. I’m still washing my hands a day later like Lady Macbeth.

Once it had started crumbling a bit I returned it to the KA, adding the egg and vinegar. After a few-scrapings-down of the bowl it had started to form the desired crumbliness, and tentative additions of ice-water soon produced a ball of dough. It was flattened between two sheets of baking paper and went into the fridge to chill and relax.

Pears:
Most recipes seemed to go for halving the pears so that they could form a ring of turtle-like humps, but I felt this to be too much pear at once for my pear-shy colleagues, and quartered them so they could be arranged in more of an overlapping fan. Some bits had gone a little far in the ripening and had to be cut back, which meant a not-very-uniform array. Then they were poached for about 15 minutes in a litre of water with 250g raw sugar and a split vanilla bean, and left to cool in the syrup.

Back to the chilled pastry, which was rolled out between the sheets of baking paper. As is its wont, the paper started to crease up under the expanding dough after a while and I peeled one sheet off to apply the rolling pin directly to the dough, but that was to take a wrong turn, let me tell you. It was a very delicate and not at all flexible pastry – the edges started to crack and break off with very little provocation. When I’d lost patience – after about a minute – and once it was only about 4mm thick, I pressed it into a greased loose-based tart tin, sticking back the broken-off bits around the sides. Back to the fridge to rest for about half an hour, then blind-baked in a 180 C oven for about 20 minutes, then another 5 or so without the split peas to dry and firm it up a bit more. It didn’t shrink at all – I guess because it lacked the gluten.

Filling (mostly lifted from Jamie Oliver. If you go there, don’t look at the comments. Although I suppose it’s nice that Young People Today are looking at recipe sites instead of having food fights in the Home Ec room…):*

125g ground almonds, scattered over a tray and toasted in the oven until golden
2 eggs
125g butter, softened
95g caster sugar
185g dark chocolate, zapped in 20-second bursts in the microwave and stirred until just melted

Mix everything together and pour into the pastry case, then arrange the drained pears in a ring on top and into the oven at 170 C.

Jamie’s 170 C and my 170 C are clearly very different things – doubtless our ovens are barely related ­– as hardly anything was happening after the recommended 45 minutes and its central regions were still sticking damply to the skewer after an hour and a half, although I think it overcooked closer to the edges.

I failed to provide the suggested crème fraîche or indeed anything at all, though it would have been nice with. 


*That’s not an emoticon, thank you very much. It’s the correct way to close a parenthesis before a colon.

Monday, 28 March 2011

Rhubarb upside-down cake


Sometimes when I have to use up something to free space in the fridge – say a bunch of rhubarb – in searching for a suitable end I stumble over many enticing options, then am compelled to go and get more of the same. It seems I need about five bunches of said rhubarb now, what with the newly found tarts and meringues and orange syrup partnerings clamouring to be made, but this time I made Fresh Rhubarb Upside-Down Babycakes from Cooking with Julia (Julia Child, Dorie Greenspan 1996), adapted a bit. 

I happened not to want babycakes, so turned to the magnificent Konstantin Slawinski silicon cake pan kindly given to me by the Saucemaker.

I’ve made a rich flourless chocolate cake in this cake pan, and very dramatic and architectural it looks, but I felt the pan would really come into its own in showcasing an upside-down-cake application such as this. It didn't keep its shape quite as beautifully as I'd hoped – I should have foreseen that the caramel would abandon its pecans and run off when inverted. I couldn't have gone past the caramel-enrobed pecans, but without it the peaks of the cake would have been unadulterated rhubarb pink and more fabulous to look at.


It’s a big pan, and needs a double quantity of most cake recipes, but I thought it’d be a good fit for this one – this recipe recommended a 12" cake tin if making a whole cake, which is one big cake tin. As it turned out, though, twice the batter could have been used, which would have allowed higher slices. Not sure I agree with the recipe's recommendation there.

1 2/3 cups plain flour
2 teaspoons baking powder
1 teaspoon sea salt
2 teaspoons vanilla extract
300mL carton sour cream
180g unsalted butter, room temperature
1/2 cup brown sugar
1 tablespoon bourbon
2 tablespoons chopped pecans
bunch fresh rhubarb, trimmed and cut into 5cm lengths, roasted with a cup of sugar and some lemon zest under foil for 20 minutes or until soggy and syrupy
1 cup white sugar
2 eggs

Preheat oven to 180 C. Whisk flour, baking powder, and salt together; set aside. Stir vanilla into sour cream and set aside.

Melt 60g butter, add brown sugar and bourbon and cook over medium heat until the sugar melts. Stir in pecans and turn off the heat. Pour into silicon cake pan or into a greased 24cm tin. Arrange rhubarb over caramel as desired; set aside.

Beat sugar and remaining 120g butter in mixer on medium-high until light, fluffy, and pale. Reduce speed to medium and add eggs one at a time, beating well after each addition. Alternately fold in dry ingredients and sour cream. Spoon batter over the rhubarb.

Bake for about an hour or until a skewer comes out clean.


I’d do this one again, especially as quite a few variations are offered, one in particular involving sage leaves. The cake part was great –very dense and a good foil for the syrupy rhubarb atop it. The Labyris Bearer was trying to work out what the tart custardy element was, which we decided must be the carton of sour cream.  


Sunday, 27 March 2011

Elizabeth Taylor and Sunday-night roast chicken


 Watching Who’s Afraid of Virginia Woolf in honour of the late great Elizabeth Taylor and that chicken leg feels like the thing to do tonight.

Plus roast chicken with a generous layer of tarragon-lemon-and-garlic butter eased and smeared under the breast skin. And potatoes tossed in semolina, the better to soak up residual fat and oil for all the more crunch.

Mint yoghurt ice-cream


Summer has come to an end – did it happen? – and surely so too will my mint.

I came across this recipe in an old Delicious magazine in a waiting room recently. As always, five seconds after one finds the first snippet of interest in the supplied reading matter, one is called. I did not rip it out, nor ask for a photocopy. No. Try me on a polygraph or stick gramophone needles under my nails. I remembered stuff and made up the gaps and maybe looked about online a bit. It went something like the following, which seemed to work okay:

2 cups castor sugar, simmered for about 15 minutes with 2 cups water to make syrup, then chilled
about a cup of fresh mint leaves
half a cup lemon juice
2 cups yoghurt
half a cup cream, whipped

Get a stick blender into the chilled syrup along with mint leaves and lemon juice. Whisk cream together with yoghurt and add cream. Add green syrup (I kept half a cup back for mojitos, only because I was worried about the amount of liquid going into the ice-cream) and whisk to combine.


Churn in an ice-cream maker. Freeze. Done!


Monday, 21 March 2011

Chocolate-mint slice


Maida knows her brownies. She is famous for carrying around cellophane-wrapped brownies in her handbag and giving them out to all and sundry.

That’s very very cool, in my view. I could do that, maybe on the 86 tram or at the pub, but I would need to learn to remember they were there. My bag’s a black hole of forgotten stuff. Such as the salted duck egg I bought on Saturday at Minh Phat and placed carefully in my shoulder bag so it wouldn’t break, instead of chucking it in the green bag to be jostled by everything else. Well, out of sight, out of mind, that’s all I can say about that little episode. (Okay then, so maybe it surfaced when I was looking for a pen during tonight’s French class, which consists of six trés elegant women who are pretty much French, and a trés elegant teacher who is totally French, and me sitting there with my egg like a character from some lesser slapstick. Mais alors, this is not a post about preserved eggs – that unalloyed pleasure must wait for another day – so back on topic.)

This is called Chocolate Mint Sticks, really, but it’s in the brownie section of Maida’s Book of Great Cookies, and is more like a slice for us. I’m resisting the endangerment of sloice’ falling victim by creeping USing to brownie or bar cookie or what-have-you. 

60g darkest chocolate (I used 70.4% Callebaut Strong)
115g butter
2 eggs
pinch salt
½ teaspoon vanilla extract
1 cup sugar, white or raw
1/2 cup plain flour, sifted
½ roughly chopped walnuts

Preheat oven to 180 degrees C. Line a 9" square cake tin or equivalent rectangle with baking paper, unless it’s silicon.

Melt chocolate and butter in a double boiler if you have one, or I did it in 20-second bursts in the microwave with brief stirs in between until smooth. Leave to cool slightly.

Beat eggs until foamy, then add salt, vanilla and sugar. Add the cooling chocolate mixture – still-warmish is okay – and beat to mix. On low speed, add flour bit by bit until it’s all just incorporated, no need to overmix. Stir in the walnuts.

Pour into the cake tin and smooth evenly. Bake for 28 minutes, or until a wooden skewer comes out clean. Leave in pan at room temperature until cool.*

Time to get on with the mint layer.

30g butter, room temperature
1 cup sifted icing sugar
1 tablespoon cream
½ teaspoon peppermint extract – or I used 12 drops essential oil of peppermint**

Beat all ingredients until smooth. You might need a tiny bit more cream, but it should be a fairly thick mixture, not runny.

Spread in a thin layer over the cooled cake, still in the pan. Place in the fridge for no longer than 5 minutes – Maida says. No idea why, but I’m not arguing. Meanwhile, on with the glaze.

30g bittersweet dark chocolate
15g butter

Melt together by microwave, stove with double boiler, as you like it, until smooth.

Pour the hot glaze over the chilled mint layer and quickly tilt it to cover completely – it’ll be a very thin layer. Refrigerate or freeze – Maida suggests serving directly from the freezer, in fact.

I was not expecting it to taste exactly like an Arnott’s Mint Slice. This is not a bad thing, though it’s many years since I would arrive home from school and polish off half an unattended packet.

(Oh, I need to lie down. In gathering for you the above pic from Google Images, the things I did see. There are people are out there recreating their favourite trashy biscuit, under the mission of the Arnott’s Challenge, or just pimping them for fun! O brave new world, that has such people in’t! What would you, dear reader, like recreated?)

*Yes, do wait for it to cool completely, take it from your chastened Macarong. If impatient to get it done because work or gym or bed calls, resist rushing it. If the cake is still warmish, the mint layer neither spreads easily – it sort of melts slightly on contact – nor chills enough in the five minutes to stay put when tilting the warm melted chocolate over the top. See? Exactly the special marbled effect I was aiming for…


**This almost caused my little brain to melt. So: use only one part essential oil to four parts extract. Hence 1/8 teaspoon essential oil=oh, impossible to measure that. Okay, let’s try another tack: 20 drops essential oil =1 mL. 5 mL= 1 teaspoon, so 1/8 teaspoon=0.6 mL or 12 drops. There. It was plenty of peppermint.

Sunday, 20 March 2011

On chocolate and Queen Mother’s Cake


It is nothing like the flourless chocolate cakes that are so popular today. 
It is not as heavy or dense … It is divine.  
                                                                                                                                                  (Maida Heatter, Book of Great Desserts, p12)

There was a Birthday at work, and an appropriate cake was needed for our Labyris Bearer.

I’d been waiting for an opportunity to try out Maida Heatter’s Queen Mother’s Cake for some time. Maida claims it to be her most popular cake, and she corresponded with the Queen Mother about it, and found that ‘She was charming.’ I’m no staunch monarchist, but I quite liked the cut of the Queen Mother’s jib myself.

In a perpetual effort towards identifying obscure connections between the birthdayer and the cake, admittedly the Queen Mother didn’t really fit the bill, but Maida’s cake was photographed crowned with a steeple of long Chocolate Cigarettes, which were much more relevant to our Labyris Bearer.

The cake was great. It’s not difficult to see why Maida is fond of it – which clearly she is, as it’s in several of her books, and she’s very discursive about it. It’s nothing incredibly unique, just a superb specimen of a flourless chocolate cake, much lighter and more textured than a mud cake thanks to the 6 beaten egg whites and the toasted-almond meal. The recipe can be found here – it’s no less than four pages in Book of Great Desserts (pp12–15), so forgive me for dodging reproducing it here. Boiled down, the cake is very straightforward and didn’t take long to put together, though it needed over an hour in the oven and a further hour of cooling before icing. And it helped to toast the almonds the night before.

But the Chocolate Cigarettes were one of those recipes that’s tucked away elsewhere in the book, and not included in the instructions for the cake. Having shirked the preliminary read-through, I found with little time to go that I needed a marble work surface – just like that, produce a marble work surface; what, you don’t have one? – and what’s more, compound chocolate (which I thought was the stuff bulk Easter eggs are made from, and to be avoided). Or if all that could be found was Callebaut instead of compound, why, turn around and temper it. Tempering makes me think of frightening episodes of Masterchef, which might be a good enough reason to give it a go one day, marble benchtops or not, but suffice to say I wasn’t up for it this early in the morning.

I ran outside to rip lime leaves off the tree, figuring they probably weren’t toxic, melted uncompound chocolate in 20-second bursts in the microwave (not having a dedicated double-boiler either) and hastily slathered the backs of the leaves with it and laid them on a plate. Into the fridge for about 20 minutes with them, then the leaves peeled away from the chocolate, my fingers melting it upon contact so that I had to prefreeze them uncomfortably with ice water.

It seemed to work. They looked like leaves. And no one was poisoned, so win-win.

***

It should hardly be mentioned in the same blogpost, but speaking of chocolate, check out this video of David Lebovitz visiting Patrick Roger, a chocolatier in Paris – now that’s working with chocolate.

***

And another word on chocolate – due to frequently wanting to make chocolate-centric things without breaking the bank, I used to be always on the lookout for specials on Lindt at Safeway, sometimes sneaking in some amount of that Coles-brand dark chocolate that’s supposed to be Belgian when making something calling for the better part of a kilo of good dark chocolate, such as this crazy buttermilk cake kindly chronicled by my colleagues here. Then one day I came across a blog that gloatingly related picking up pounds of bargain Callebaut at somewhere American called Trader Joes (like I won’t be checking that out when I go to the US next month, and filling my boots), and it filtered through to my dim brain that maybe there was a way of finding bulk decent chocolate in these parts. 


Well, turns out there’s a chocolate-making school called Saveur almost round the corner in Brunswick, and beyond its macaron towers lie racks of Callebaut 2.5 kilo bags exactly the size and shape of the Eukanuba pellets I buy the cats, and at $46 they’re a better deal than any Woolies special, even if not quite the super deals that can be had in the land of the free. I’m working my way through two: the bitter 70.4% Strong and the semisweet 53.8% Select, which I often combine as some sort of middle road. Much as I like my chocolate dark and dusty as hell, I find the Strong is a bit … well, strong. It bears little relation to the 70% Lindt, and is bitterer even than the Lindt 85%.

Saturday, 19 March 2011

Frockmaking and mustard carrot-and-leek tart


So it was Labour Day, and the Quiltmaker and the Tall Designer and I had no work to go to. The Quiltmaker decided to make herself a frock, and the Tall Designer decided to make his girlfriend a frock. On the very same day.

As neither of them had made a frock before, they convened for mutual support at the Quiltmaker’s charming home – it has a cellar and everything – and (as I have popped my frock-making cherry) they invited me along in case trouble was run into, and also because I’m the proud owner of an eBay-won Babylock that beats zigzagging seams by a million miles as long as you don’t get a chunk of the garment caught in its cruel blade.

In keeping with the wholesomeness of it all, the question had been raised of how best to sustain us through the day. The occasion was risen to superbly, with the Quiltmaker’s sylvanberry and chocolate-chip mini-muffins and the TD’s huge wedge of brie with seedy crackers. I chipped in Gérard’s Mustard Tart, from p54 of Dorie Greenspan’s mighty Around My French Table.

I have made this tart before, both versions – the traditional Dijon tomato version is a winner too. It has a great tart crust, which can easily be made in double quantity and a flattened disc of its dough clingwrapped and frozen for another time (such as this day turned out to be), and for all sorts of other tarts for that matter. And it’s not every day you get to celebrate mustard as a chief ingredient. It’s just right – not overpowering, but definitely speaking up for itself.

The first time I made this version, following the instruction to prepare the carrot and leek in batons to radiate prettily from the centre caused the more resilient strips of leek to mess up the slicing a bit, and they wouldn’t quite be bitten off either, coming away inelegantly all in one piece. This time I cut the leeks in inch-long lengths, leaving the carrots to play the part of the sunrays.

I also increased the filling quantity quite a lot to fill more of the tart shell – I made it 5 eggs rather than 3, and 3 bulging tablespoons each of Dijon and wholegrain à l’ancienne mustard rather than 2 proper levelled ones. It’s a very forgiving recipe; I had only a scant few tablespoons of leftover whipping cream rather than the called-for 6 of double cream or crème fraiche – which I would have otherwise more-or-less doubled, given other increases – but no harm done.

On the frockmaking front, no trouble of note was run into and by dinnertime both frocks were at trying-on stage, which was extremely good going on both their parts. Neither pattern was the most straightforward, especially the Quiltmaker’s Amy Butler Lotus Dress, but she was undaunted by the puffed cap sleeves and took up the gathering with relish, and the challenge paid off with possibly the cutest frock known to humankind. The TD’s elegant frock with its neckline tucks and darts and shaped shoulder straps was well served by his precision, and its handstitched hem was a delight to behold; unfortunately his GF was overseas and couldn’t try it on, but we felt confident in the complex calculations of her measurements gleaned over Skype with the aid of sheets of folded A4 paper.

Wednesday, 16 March 2011

Pull-apart cinnamon–sugar bread


Once upon a time, about a quarter of a century ago, an aunt introduced me to toast sprinkled liberally with sugar and ground cinnamon. I couldn’t imagine anything tasting better than this ambrosia, and had every intention of never eating anything else when I grew up and could eat what I liked, except maybe liquorice bullets and Mint Slices and chicken-flavoured Twisties. But this passed, and I haven’t thought of cinnamon toast since I was a teenager.

Until now, thanks to a chance encounter with Joy the Baker.

This is cinnamon toast all grown up, with browned butter and rolled-out dough cut into squares and piled into a stack that goes not-too-evenly into a bread tin and is baked, so that its many points become crisp and its yeasty insides light yet moist and clingy as its warm segments are peeled away for breakfast. 


And it’s dead easy, as long as you don’t wake up of a morning and decide you want it then and there. A bit of pre-planning works well for the necessary risings. For example, say it was the evening before a public holiday, and friends were coming to have a late one and stay the night – the slices could be risen, the tin covered with Glad Wrap and bunged in the fridge to arrest further rising, then resumed in the morning. 

And should a guest decide to sneak back home at daybreak, before the fragrance of baking bread and cinnamon has a chance to waft through the house, well, they leave all the more for the rest of us. O Glenn – all this, all this could have been yours.


Friday, 11 March 2011

Whole lemon bars


*
 I haven’t come across a lot of this style of lemon slice – or lemon bar, as David Lebovitz and the rest of the US would have it. It’s not the usual tuckshop bakeless condensed milk/crushed-biscuit lemon sloice with a layer of lemon icing and desiccated coconut, but is more like a lemon curd layer oven-baked over a prebaked shortbread crust.

This uses the whole lemon, so organic ones are called for; Meyers tend to be mentioned a lot when it comes to baking sweet lemony things, but I’ve never come across them that I know of. I turned to the huge husky lemons I was given from someone’s tree, rather than schlepping to an organic shop with baskets and hand-chalked blackboards (organic produce: a good thing; the cultish well-heeled smugness often – that’s often, as in not always – surrounding its supply and consumption: sometimes sick-making). These citrus footballs had a thick layer of pith, so I peeled off the good skin with a veggie peeler and then cut away the potentially sour pith and ditched that.

I also threw in a lime cut in quarters in lieu of the juice of another lemon, although would the food processor chop up the skin? Would it bugger, to paraphrase Bubble of Ab Fab. It had to be fished out and chopped manually in a pool of lemony, sugary egg as I puzzled over how the blade would know the difference between that and lemon rind.

And it would have been better to remain out – anyone who copped a mouthful of lime rind as an introduction to the slice got the old involuntary mouth-pucker, however tart they claimed to like their lemon slice. Despite this, all were polished off by the end of the working day – only the Tall Designer was a total wuss and couldn’t finish his piece. I think the delicately crunchy buttery shortcrust base went a long way to soothe most.

*Admire with me the shot kindly taken by the Quiltmaker with her nifty Hipstamatic app just before the last piece vanished. I love its ghostly grid and its nostalgic orange cast, although by the harsh light of day the slice was rather more pallid.

Wednesday, 9 March 2011

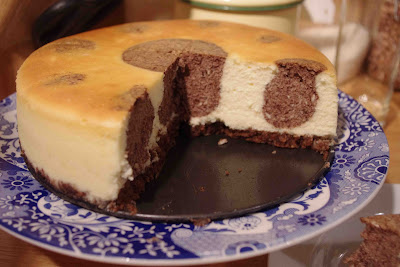
Polka-dot cheesecake


I finally got to make this recipe! It took two lots of the yoghurt cheesecake I made earlier, plus a real block of Philly I threw in as some sort of compromise. 

I deviated from Maida’s recipe just long enough to make a normal biscuit base with half a packet of crushed Arnott’s Milk Coffees, 60g melted butter and a tablespoonful of Droste cocoa, mixed and pressed on the base of a 20cm springform tin, and put in the fridge while I got the rest together. I found odd the concept of inverting the cooked cheesecake in order to sprinkle biscuit crumbs on the bottom and then turn back again. I’ll give it a go some other time out of interest.

It’s very cool how it goes together – I expected it to be much more involved. But two cups' worth was simply taken out of the cheesecake mixture and had melted chocolate mixed into it, then the bulk of it went into the springform tin to fill it about halfway.


 That done, the chocolatey portion was poured into a piping bag with the largest nozzle I could find (about 5mm, although Maida suggests a half-inch one), the nozzle inserted just below the surface of the main cheesecake dead centre, and enough squelched in so that a large circle forms on the surface.

Then smaller circles are piped in the same way around the rim – I took heed of Maida’s advice to start out placing them at opposite points to ensure evenness, although I think I’d go closer to the edge next time. It would have been nice to also see the chocolate circles on the sides.


 The surface ends up bulging with the circles, but it evens up during the cooking.


But the keenly anticipated moment was cutting the thing open, not least as it was in the service of The Guitar Teacher's birthday. After the hours of cooling and refrigerating, it still was wobbly enough to make me doubt the neatness of passing a knife through it. I tried some sewing cotton that was handy, which worked a treat, and lifted out the first piece. It didn’t come out without a fuss, leaving a chunk of base behind, but the second slice fared better. I had a hunch it was best left on the springform base.

It came out better than I’d hoped (I wouldn’t have been surprised if the chocolate had melted into the surrounding mixture completely, in which case I would have passed it off as chocolate marble cheesecake or the like) although the polka dots aren’t round enough compared to Maida’s perfection. I have some thoughts about how to get around this next time. Perhaps refrigerating the main bit for a while to firm up might help it keep its integrity better – although equally it could make the chocolate bit have to force its way in and be even more misshapen.

And it tasted pretty good – possibly a little more tart than normal, though I’d have to make a version with all Philly to be sure of that – and the texture was light. All round, I think the use of homemade cream cheese was a winner.


Tuesday, 8 March 2011

Yoghurt to cream cheese


I’ve been dying to have a crack at Maida Heatter’s Polka Dot Cheesecake, but can’t come at shelling out for a kilo of Philly. That’d be twelve hard-earned dollars hanging on a creation that I could stuff up, very easily. 

To turn to Google with "how to make your own cream cheese" reveals that, for some people, to make what I would call labneh is also to make cream cheese. I’ve made labneh before and know it to have a tarter taste than Philly, but maybe that’s not such a bad thing.

First, I make yoghurt, about which much DIY opinion and technique is out there thanks to people who have done a lot more research than I have, but I’m with Madhur Jaffrey. Suffice to say that I bring whole milk (usually bog-standard Pura, though organic, sheep’s or goat’s milk works too if feeling artisanal or prosperous) to a scalding point where it forms a skin that starts to rise with tiny bubbles, then I turn off the heat and go away and do something else and let it cool down to about 40 C, trying not to forget completely about it.

Then it goes into a jug along with a couple of dollops of the previous batch of yoghurt as a starter, plus a good half-cup or more of whole milk powder to help thicken it (saw this tip online – it never ends up as neatly scoopable as Jalna pot-set-type yoghurt, but it definitely helps), is briefly stirred up, and poured into a prewarmed wide-mouthed thermos, and left to form good bacteria or some such for at least eight hours, though I’ve let it go up to 24 hours without serious known consequences. I think it just gets sourer the longer left to its own devices after eight hours, without getting any thicker.

Or yoghurt could be bought, though since I’ve started making it myself it’s pained me sore to have to buy six dollars’ worth of Jalna from the shop if it so happens we run out – it took some time before the consequences of completely using up the current batch penetrated the household consciousness. Words were had.

Anyway, so to make labneh/cream cheese, the yoghurt is scraped from the thermos into a bowl lined with a length of muslin (or Chux). The ends are scooped up, knotted loosely and hung from something over a bowl. A wooden spoon through cupboard handles works for me. The bundle drips gently for at least four hours, or overnight, or all day while at work.* And that is it.

Lo and behold, it forms a lovely solid-ish mound with the weave of the muslin imprinted in it.


 *The cup or two of whey that collects in the bowl below can be used in place of water in  breadmaking, or as a stock in cooking rice. It’s meant to be highly nutritious, and once you’re past the first sourness, is actually not that bad to gulp down as is and imagine it doing you good. Plus there’s the smugness of using up everything. It can at least go in the cats’ bowls before ditching, or be stuck in the fridge for later reference, where it can last a few weeks – even months, some do say.
 
Draining 750mL yoghurt yields 250–300g cream cheese/labneh. So this cheesecake needs a series of batches over a few days, as I’m limited by thermos size. On the one high-thirties day we’ve had this so-called summer, I made up yoghurt with two litres of milk that I poured into litre glass jars rather than the thermos, and stuck outside wrapped in a towel. It worked well, though if the temperature had suddenly dropped partway through – another feature of this so-called summer – they would have been a goner.

Saturday, 5 March 2011

Feelynge dellicate?


For this Sabbath I am no Huswife able to werke nor bayke fine, and like to dye upon my couch from greyvus colde of the hede, hath occaysionned from mine faithfull and gentil Knyghte a grete Dyner in possession of healynge powers tayken fromme the grete wysdom of the accomplisht Japaneis. And folowes the instruccion I saieth unto he thys nyte.

Baythe salmon fyllets in poltice of Mirin and soy sauce for as many houres as thou hast to spaire. And within the Braun devyce gather gynger and garlicke and corriander and Oyle, and with fine choppynge forme a payst. Udon noodles do be boyl’d in faire water and drayned. Thy skyllet shall bee set upon the fyre, then salmon upon it layd tyl it doth be cryspe goldness without and so upon that to caste sea weede and the juyce of Lyme.

And so thou mayst serve untto the weake and yll in thine owne howse yf it pleese thee, thys receipt from Goody Macarong doth be humbly given on thys litel Blogge.


Charlie Brown’s peanut cookies


Couchbound illness prevails while the sun shines gloriously outside. In an attempt to drag this fledgling blog from congee back to baking, let me tell of Maida’s Charlie Brown’s Peanut Cookies I made a couple of weeks ago.
I was drawn to the name, and these got an enthusiastic wrap by other Maida Heatterers online, and the very American approach of focusing a cookie upon peanuts had previously gone down well with the workmates flocking around the biscuit barrel.

Well. Not bad, but never again. These ‘hand-formed cookies’ took up an outrageously hefty chunk of valuable Sunday evening.


Wait a tic, or feel free to skip the following digression. Baking often strikes me as a weird and paradoxical pursuit to be drawn to, and not only because the image of apronned, Betty Draper feminine domesticity traditionally associated with it brings me out in hives politically. Here it is, the true heart of the matter: I loathe the feeling of any flour or eggwhite slime or dough gunk on my hands. I seem to get past both the hands thing and the feminist ambivalence, but still. Weird. It helps not to wear a floral pinny, I guess, and also to let the KitchenAid take care of kneading. Dried crusted flour on fingers. Under nails. Shudder. Anyway, apologies, this is a discussion for another day and merely a longwinded and tangential way of relating that I was washing my squeamish mitts every five seconds here.


From Maida Heatter’s Book of Great Cookies, 1977, pp231–2

Makes 36 (more like 46 for me, and they didn’t seem small…)

2 cups (220g)* plain flour, sifted
1 teaspoon double-acting** baking powder
½ teaspoon ground cinnamon
236g butter***
1 cup (200g) dark brown sugar, firmly packed
2 eggs (one whole, the other separated)
1 teaspoon water
285 g roasted salted peanuts, chopped medium fine
smooth peanut butter – just spoon from the jar.****
dark choc chips

*Your devoted correspondent has taken account of the fact that US cups are different to ours, and has found online converters that offer cups by weight. Place your trust in me; I’ve placed it in an online converter. I’ve offered you the original cup measurement if you’re not with me on this journey.

** Double-acting, you cry? WTF is that? I’d never come across it before either. It’s about chemical compounds and what happens when. From googling, I think pretty much any baking powder you can buy these days from Woolies is what decades ago was considered double-acting, reacting in two stages to the liquid of the batter and then to the heat of the oven, distinct from a single-acting baking powder, which only produces a reaction when first encountering the batter and needing immediate baking.

***Being American, Maida calls for 2 ‘sticks’, which my research has established are 118g each. Want to round it up to 240g? Oh, fine then. In fact, just use those 50g-increment lines printed on the butter paper, like I do all the time. What could go wrong?

****Don’t look at me like that, I’m not being inexact here – Maida says: ‘it is not necessary to measure this; you may use it right from the jar’! It was probably about half a cup I used, perhaps not even.

Sift together the flour, baking powder and cinnamon and set aside. Cream butter with electric mixer. Add sugar and beat to mix. Beat in one whole egg and one egg yolk. Lower the mixer speed and gradually add the dry ingredients only until thoroughly mixed. As in, don’t let it sit there mixing away for ten minutes while you’re catching up on Twitter – it’ll overbeat the mixture and really I can’t say what might happen then. That’s because I don’t actually know, but suggest it’s not good if Maida warns against it.

Preheat oven to 190 C and cover a couple of flat trays with baking paper or that reusable silicone stuff.

This bit to follow differs from Maida’s way, which calls for long strips of waxed paper and division of dough into 36 equal mounds and then flouring hands before rolling each mound into a ball. You’ve endured my rant on how I feel about floury hands, so this is my way, which I learned in the making of chicken meatballs. It’s the dead opposite – keep wetting your hands to roll the dough into balls. They’ll turn out shiny and slippery and leaving no residue until it’s time to wet your hands again – about every five balls. I put them to rest on a dinnerplate or two, rather than great sheets of waxed paper I have no bench-room for. Also, waxed paper may have changed since Maida’s day, but the Home Brand crap which was all Woolies had last time I was in the market for it soaks up any liquid and dissolves. ‘Greaseproof paper’ my foot.

Put the chopped peanuts in a shallow pasta bowl or dinnerplate. Beat the egg white and water with a fork in a small bowl or cup, and dip each dough ball into it, sliming the egg white all over it before proceeding to roll it around and coat thoroughly with peanut bits. Place these 4cm apart on the prepared baking trays as you go, but the mucking-around is by no means over yet.

Next, you need to form a depression in each ball. Maida suggests you use either the handle of a wooden spoon or your thumb. I tried both and found much greater control with the latter, which handily had a very short nail for once, from lute practice. You want the impression fairly big, but not so much you breach the bottom or sides, and you can use your thumb to shape it out better than a rigid handle. Then I used a small pointy coffee spoon to fill the impression with peanut butter, topping it with 5 choc chips.  

Bake until browned a bit – Maida says 12 to 13 minutes, but in spite of that broad span, mine took more like 20. I used that time scrubbing and anointing my hands. Let them rest on the trays for a few minutes before lifting them onto a cooling rack with an eggflip. I overlooked Maida’s instruction to put them in the fridge once they’d cooled to room temperature, to solidify the peanut butter and choc chips, but take heed from my error. The choc chips never regained their solidity, and stuck to each other when layered in a Décor container to take to work, so that some lucky colleagues ended up scoring double their biscuit entitlement, with the peanut-butter-choc-chip component of the biscuit below theirs.
 
They tasted great, and were moreish, but in a very one-note, unsophisticated way – the attractions of chocolate and peanuts were right up front, so to speak, and in appearance they were far from elegant.  Meh. The peanut butter cookies I’ll tell of another day were far simpler and just as crowd-pleasing.

Thursday, 3 March 2011

Illness congee


It’s definitely the only time I’ve been smitten with a meal on a plane. It was breakfast on an Air China flight, and the flight attendant offered me ‘porridge or cooked breakfast’. In my bleary-eyed and fragile state, I was vaguely surprised at the option, but considered the comforting quality of porridge and went for that. How bad could it be, compared to rubber eggs and … wedges? Well, you be the judge.


It turned out to be congee rather than Uncle Toby’s, and, with nothing to it beyond rice and water and some sort of preserved egg and pickles, it was the epitome of comfort. Almost tasteless, like baby food; translucent fragments of rice as a milky souplike formlessness.

Since then, I’ve made it at home for breakfast; whenever I’m home alone and can’t be bothered cooking anything else (can’t be beaten as a work-knackered singles solution); and when I’m under the weather but am able to shuffle about the kitchen for the time it takes. With the throat and woolly head I’ve got right now I would have preferred someone else cook it and bring it up the stairs, maybe even spoon it gently into my mouth (okay, that’d be a recipe for impatience), but needs must when the devil drives.

Consider these excellent congee features:

·      Ideal for when there’s nothing in the fridge in the way of ‘fresh’ veg except for an ageing carrot and a shrivelled spring onion.
·      One-pot chuck-stuff-in wonder.
·      Costs about thirty cents a meal; ooh, maybe forty cents if getting fancy with dried shiitakes.
·      As well as 50% cheaper, could be argued to be more nutritious than Maggi Chicken-Flavoured Two-Minute Noodles, especially if tailored to the needs of an upper-respiratory-ailment sufferer. As I fall into that category, today’s congee was supplemented with grated ginger, chilli and a few whole peeled garlic cloves. 
 

 Congee is about as old as humankind and has a thousand names and cooking methods, often much more elaborate and interesting ones than found here, but this is my unschooled take on it.

1/4 cup broken rice, or about a cup of last night’s leftover cooked rice
3–4 cups water.
The rest is up to you, the contents of your fridge, and your energy levels.

As well as the above odorous substances, today I added a roughly chopped carrot and celery stick, a teaspoon of stock powder, and a few broken dried shiitakes. That was about all I had available, since it’s now Thursday and the lean end of the week. Other times I’ve added dried anchovies, XO or soy sauce or sesame oil, a handful of bok choy or coriander, leftover bits of roast chicken, fermented black beans if I’m feeling brave, or an egg at the last minute.

Bung the rice in a small saucepan, cover with water a few times and swoosh around a bit to wash, then add the cooking water and a pinch of salt and leave it to do its thing over a low–medium flame, stirring now and then – like every time you add an ingredient found at the back of the veggie crisper.

That seems a lot of water to rice, I know. But it somehow expands to use up all that liquid, especially with dried mushrooms. Twenty minutes should do it – it’ll keep thickening on standing, too. It takes a while to cool down enough to prop under the chin, lie back and feebly eat with a soup spoon.

The mushrooms in this one make it look a bit muddy, whereas the simpler you go the whiter and more pleasing its appearance.

I shall now slump back on my pillows, and promise there will be matters more demanding of finesse dealt with soon. I was to be making macawrongs this week, FFS!


Tuesday, 1 March 2011

Chouquettes


When I was in Paris last year, I kept walking into patisseries and laboriously requesting in my painful French the things I was familiar with and felt should rightfully be ordered when in a real Parisian patisserie – croissants, macarons. Then the person behind the counter would inevitably respond in excellent English. Anyway. Familiar tale.

So. I kept seeing these golden blob-like objects covered in large white granules and eventually, out of curiosity, asked for one along with a baguette. The woman said, ‘Just one?’ and looked knowing. I took just the one and stuffed it in my greedy tourist mouth just outside the shop – and had to immediately retrace my steps as though on puppet-strings and buy six more.

They were light as air, buttery, nothingness and substance, and the crunch of every grain of pearl sugar was a surprise. I didn’t know their name. 


I took this picture of the unidentified objects and posted it on Twitter and publicly refused to come back to Melbourne until a source was made available, but no one in Melbourne took heed, and we had return flights and arrangements with catsitters and workplaces, so I was forced to back down and return ignominiously to a land without chouquettes.

Well, I couldn’t sleep one night this week and my lack of chouquettes weighed on my mind. Dear reader, I got up and made some damn chouquettes like a dog no longer sitting on a tack. (I’d been working up to it – I’d recently spent many hours trying to find pearl sugar (aka crystal sugar, rock sugar, nib sugar, parlsucker) online and going on a wild goose chase to Ikea before submitting to David Jones’s Food Hall where I shelled out twelve bucks for a small bag.) I took the internet shortcut and third in Google was the trusty David Lebovitz. I followed everything but the choc chips – my Paris chouquettes never had choc chips.

I had everything required, which made it seem meant to be. That never happens. Novelty sugar aside, it’s butter, flour, egg, all in a saucepan melted and mixed together, a bit like a roux. I love those recipes that undergo an instant transformation when flour is introduced to melted butter and morphs into a neat ball, leaving the saucepan spotless. Then piped into blobs, eggwashed and studded with pearl sugar. Nothing to it.

They’re great right out of the oven, great an hour later, great for late-morning tea. Their vaguely crisp, egg-whiffy charm doesn’t last indefinitely, though. I took mine straight into the work kitchen, from whence they thinned out until there were only a few left – I gathered them up at the end of the day to take home for The Guitar Teacher – he appreciates what scraps are left – and they’d become soft and somehow clammy.  He still appreciated them.